|

cladding
Back
real cedar cladding
introduction
Back
cladding home
cladding gallery
why real cedar?
western red cedar characteristics
sustainability
biophilia
design & spec
Back
cladding grades
engineered cedar
cladding calculator
building
Back
preparation for installation
pre-building tips
dupont™ tyvek® drainwrap™
installation
general installation
installing profiles
finishing
Back
how to finish
types of finishes
care & maintenance
restoration
cladding profiles and trim
Back
t&g cladding
trim boards
bevel cladding
board and batten cladding
shiplap or channel cladding
shingle panels
western red cedar soffits
decking
Back
real cedar decking
introduction
Back
decking home
decking gallery
why real cedar?
western red cedar characteristics
sustainability
biophilia
engineered cedar
planning
Back
decking calculator
building
Back
fastener recommendations
stair & railing installation
finishing
Back
finishing tips
restoration
care & maintenance
deck projects
Back
roof deck
raised deck
ground level deck
uphill sloping lot deck
outdoor
Back
real cedar outdoor
introduction
Back
outdoor home
outdoor gallery
why real cedar?
western red cedar characteristics
sustainability
biophilia
engineered cedar
design & spec
Back
real cedar free diy project plans
design tips
building
Back
project preparation
outdoor fasteners
fence construction
fence specifications
prebuilt fence panels
finishing
Back
finishing techniques
finishing tips
restoration tips
project care & maintenance
fencing
Back
fencing home
fence construction
fence specifications
prebuilt fence panels
indoor
Back
real cedar indoor
introduction
Back
indoor home
indoor gallery
why real cedar?
western red cedar characteristics
sustainability
biophilia
engineered cedar
building products
Back
building preparation
design tips
finishing
Back
finishing tips
care & maintenance
indoor projects
Back
indoor t&g paneling
cedar saunas
doors & windows
blinds & shutters
timbers
Back
real cedar timbers
introduction
Back
timbers home
timbers gallery
why real cedar?
western red cedar characteristics
biophilia
engineered cedar
planning
Back
grades and specifications
span tables
building
Back
preparation
installation
maintenance
Back
finishing
restoring western red cedar timbers
care & maintenance
resources
Back
real cedar resources
case studies
gallery
cedar books
sustainability
|
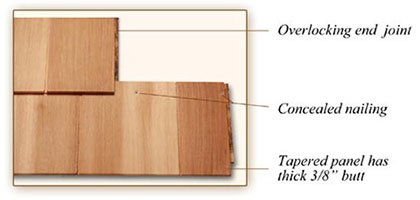
Installing Shingle Panels

What preparation is needed before installing Western Red Cedar shingle panels?
Below are the steps to install Western Red Cedar shingle panels.
 Clean surfaces thoroughly prior to installation.
- Prepare surfaces using the methods recommended by the manufacturer for achieving the best result for the substrate under the project conditions.
- Determine prior to framing layout which corner treatment is to be utilized. Panels require a nailable area 5-1/4 inches (133 mm) of outside corners and 3-1/2 inches (89 mm) of inside corners.
- After framing is completed, install building paper horizontally, shingle style, beginning at bottom of wall with 3 inches (76 mm) overlaps.
- Corner boards, trim and molding:
- Shall be extended a minimum 1 inch (25.4 mm) from sheathing to allow for 7/8 inch (22 mm) depth of applied Shakertown Craftsman shingle panels.
How do I install Western Red Cedar shingle panels?
 Install in accordance with manufacturer’s instructions.
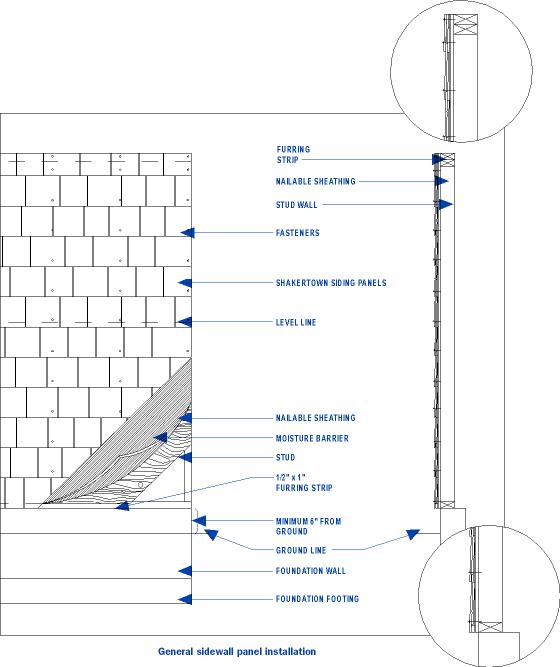
- Install shingle panels by attaching to solid nailable sheathing, spaced nailable sheathing or to studs.
- Install working from the lowest level up to the top of the wall area
- Furr out the bottom course of cladding with 3/8 inch by 1 inch (9.5 by 25.4 mm) wood strips. Allow for canting of the first course of cladding and install to level line.
- Drive nails flush with cladding surface, penetrating studs at least 1/2 inch (12.7 mm).
- Maintain 1/8 inch (3 mm) spacing at corner boards and trim. Caulk with non-hardening sealant.
- Maintain 1/16 inch (1.6 mm) spacing between ends of panels in order to allow for natural expansion.
- Maintain 1/4 inch (6 mm) space from panel butt line and flashing.


© 2026 All rights reserved
Gatsby Website Development by Jambaree