Real Cedar Logo
cladding
Back
real cedar cladding
introduction
Back
cladding home
why real cedar?
western red cedar characteristics
sustainability
biophilia
engineered cedar
design & spec
Back
cladding profiles
t&g cladding
trim boards
bevel cladding
board and batten cladding
shiplap or channel cladding
shingle panels
western red cedar soffits
building
Back
preparation for installation
pre-building tips
dupont™ tyvek® drainwrap™
installation
general installation
installing profiles
bevel
board & batten
tongue & groove
lap or channel
trim boards
shingle panels
finishing
Back
how to finish
types of finishes
care & maintenance
restoration
decking
Back
real cedar decking
introduction
Back
decking home
why real cedar?
western red cedar characteristics
sustainability
planning
Back
decking calculator
deck projects
roof deck
raised deck
ground level deck
uphill sloping lot deck
building
Back
fastener recommendations
stair & railing installation
finishing
Back
finishing tips
restoration
care & maintenance
outdoor
Back
real cedar outdoor
introduction
Back
outdoor home
why real cedar?
western red cedar characteristics
sustainability
design & spec
Back
real cedar free diy project plans
design tips
building
Back
project preparation
outdoor fasteners
fence construction
fence specifications
prebuilt fence panels
finishing
Back
finishing techniques
finishing tips
restoration tips
project care & maintenance
indoor
Back
western red cedar indoor
introduction
Back
indoor home
why real cedar?
western red cedar characteristics
sustainability
planning
Back
cedar saunas
traditional saunas
infrared cedar sauna
cedar indoor design tips
building products
Back
building preparation
indoor t&g paneling
doors & windows
blinds & shutters
finishing
Back
finishing tips
care & maintenance
timbers
Back
western red cedar timbers
introduction
Back
timbers home
why real cedar?
western red cedar characteristics
sustainability
planning
Back
grades and specifications
building
Back
preparation
installation
maintenance
Back
finishing
restoring western red cedar timbers
care & maintenance
Installing Bevel Cladding

How do I install Western Red Cedar Bevel cladding?

Spacing for the bevel cladding should be laid out beforehand. The number of board spaces between the soffit and bottom of the lowest piece of cladding at the foundation should be such that the overlap is as per the table.

Start with the bottom course using a furring strip to support the lower edge. Each succeeding course overlaps the upper edge of the previous one by a minimum of 1 inch. Rabbeted patterns are self-spacing, but leave 1/8 inch expansion clearance. Where possible, the bottom of the board that is placed across the top of the windows should coincide with the window cap.

Bevel Siding Installation Profile Diagram

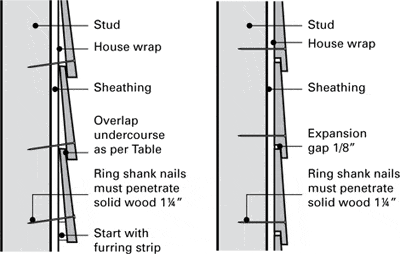
Bevel cladding should be face nailed to studs with 1-1/4 inch penetration into solid wood using one nail per piece spaced at a maximum of 24 inches on center. Place nail just above the overlap. Take care not to nail through the overlap of two pieces.

Do not reduce the cladding overlap recommendations given in the installation sections of this publication. Doing so could result in damage from wind-driven water. Use the larger overlaps for unseasoned cladding to allow for shrinkage and expansion. Take care not to overdrive fasteners when using larger overlaps. Butt joints between boards should be staggered and meet on studs. Fit cladding snugly to other pieces and to trim.

Recommended Overlap
Nominal Size (in.)Overlap (in.)
41
61
81 to 1-1/8
101 to 1-1/2
121 to 2

*These overlap recommendations must be followed for proper installation.

© 2026 All rights reserved
Gatsby Website Development by Jambaree

Image Gallery